How to Make Seamless Pattern in Adobe Illustrator
- Vanessa Adam
- Aug 20, 2021
- 6 min read

Hello everyone! Today I'll be teaching you how to make a seamless pattern in Adobe Illustrator! It's super easy, and there's 2 ways you can do it, so you can choose what method suits you best!
THE FIRST WAY : MANUAL
So, the first way you can make a seamless pattern is by doing it manually.
Now, that might sounds daunting if you've never done it before, but don't worry! It's actually very simple, and I actually prefers making my patterns manually!
Ok, without further ado, here's how you do it:
1. Prepare Your Elements!
First, you must the elements for your pattern! You can make it directly on Illustrator, or you can make it somewhere else, save it as PNG (without background is recommended! it will make your process way easier) then import your PNG to Illustrator

Here is an example of 6 potted cactus I've previously drawn on Photoshop, I've imported the file to Illustrator and expanded it with image trace. This is important! If you imported your elements, make sure to trace and expand them! If Image Trace isn't visible on your panel, go to Windows > Image Trace and it will appear.
When you trace your image, make sure to choose the color mode, and in Advanced Option choose "Ignore White", this will ensure only your elements are traced, without that option your background will be converted to a white background. Make sure to ungroup your image and then group each element on their own!
Okay, now that your elements are ready, next
2. Make An Artboard
For this, I recommend making a small artboard, I usually go for 300 x 300 pixels, but you can make your own size, just make sure it's a square!

One square artboard, check! Now, you just put your elements on this artboard and proceed to the next step :
3. Arrange Your Pattern
Now it's time for the fun part! Arrange your pattern however you like! Use your artboard as a guide to how you want your pattern to be repeating, don't be afraid to put it over the edge, but do keep in mind that for every element you put over the edge, you have to put them on the opposite edge too!

Here's mine, you will see that when I have the elements hanging off the right border, I left some free space in the left side, this is to give space for the element to repeat without crashing to other elements.
But how do I make sure the element repeated perfectly on the other side you ask? Well, now is the time for us to move to the next step :
4. Move Your Element
Now, to make this pattern repeat seamlessly, you need to fill those gaps on the other side, to ensure the elements are repeated perfectly, you right click on the element, go to Transform > Move

Now a pop-up box will appear, make sure to click preview so you can see what's happening, now, make sure your horizontal and vertical are set to 0, then in the distance section insert your artboard's size, so in my case, I put in 300 pixel. Also make sure that the angle is right!

So now you can see that the element is where they are supposed to, make sure to click copy, not OK, if you click OK, you will lose your first element, and have to move it again!
Now, just repeat that to all the elements that hang off the edge!

And there we go! At this point I'd recommend grouping the elements together, but it is up to your preference! We're not done yet here! Next is :
5. Add A Background
Now, this step is optional, but if you want to add a background, you have to make sure that your background align perfectly with your artboard, if there's a part of the artboard not covered by your background, it will appear as a line in your pattern, and you don't want that!
To make sure your background is perfectly aligned with your artboard, go to your Rectangle Tool (shortcut M), and make a square exactly the size of your artboard!

Don't forget to send your square to the back, so that it doesn't block your elements!

Now, you go to your Align window (Window > Align) and align the square to your artboard, I usually do horizontal align center and vertical align center, just to make sure it's really center, but since this is a square, it's really up to your preference, just make sure to align it both vertically and horizontally!
6. Add A Bounding Box
Now, to make sure your pattern appears nice and good, you will need to add a bounding box, this is very simple, you go to your layers, and you duplicate your background, so now you have 2 squares, select the one at the bottom of the layer, and disable the color and outline, so it's an empty box, and there you have you bounding box! Even if you don't use a background, you will still need to make this bounding box!

7. Putting It In Your Swatch
Now, you've successfully made your pattern! Congrats!!
But how can you use it? Well, you need to put it in your swatch! First, open your Swatch panel (Windows > Swatches), then select everything from the bounding box to the elements

You will find many color swatches and pattern swatches in your swatch panel, you can remove them by selecting them all and dragging them to the trash icon, or you can leave them be, up to you!
Now, you have to drag your pattern (remember! Everything must be selected! Especially the bounding box!) to your swatch panel

And there you go! Your pattern is in your swatch and is ready to be used!
I have made another version of my pattern, without the background, let's take a look at them!

There you have it! You can use this pattern as fill or stroke, it works like how a normal Illustrator swatch does! Not hard right?
Now, let's move on to the 2nd way you can make a pattern in Adobe Illustrator :
THE SECOND WAY : USING PATTERN TOOL
We just covered how to make a seamless pattern manually, and some of you might be thinking "that's way too complex! I don't want to do that!" Well, rest assured, there is actually a faster way to do it!
Now, I'm not gonna proclaim one method as better than the other, it is completely subjective to how you enjoy working, but I do have to admit that this way is objectively faster.
1. Prepare Your Elements
Just like before, you must first prepare the elements for your pattern, make sure to trace and expand them!

Here is another example! I've drawn tree stump pattern in Photoshop and imported them to Illustrator, these have been traced and expanded.
2. Make An Artboard
Just like before, you must make a square artboard! Make sure it's not too big!
There we go! After you put your elements in the artboard you'll be ready for the next step :
3. Make Your Pattern
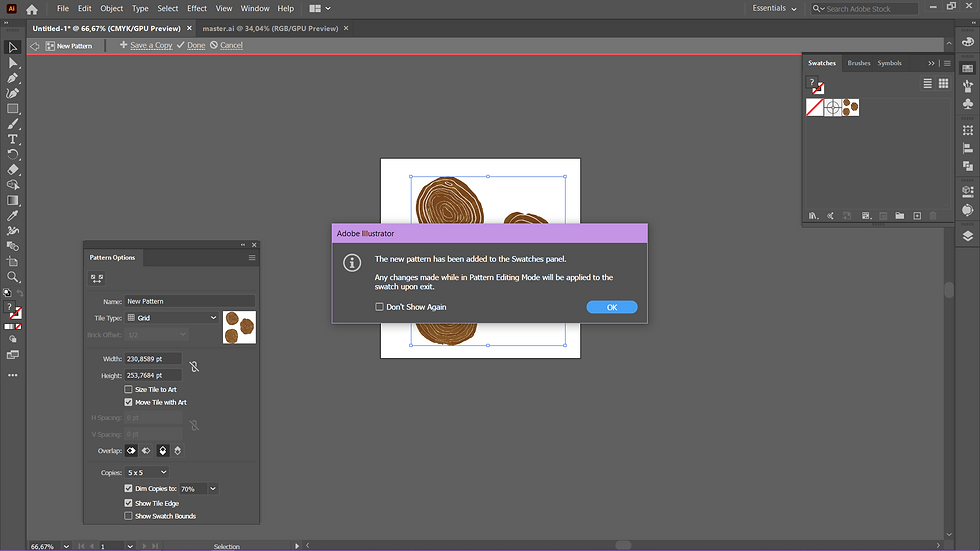
Now that you have your elements in your artboard, you need to select all your elements, and then go to Object > Pattern > Make

When you click Make, a pop-up will appear letting you know that now your work is automatically added to the swatch panel, and any changes made will be automatically updated to the swatch! Just click OK
In the width and height section, make sure to fill in the size of your artboard! So mine will be 300 pixels

And now, you can arrange your elements however you like, just make sure there aren't any cut element!

There we go! Now that the pattern is nice and good, we move to the next step
4. Add A Background
Again, this step is optional, but if you do want to add a background, you can add a square at the back of your elements, now, because we are using the pattern tool, it's okay if your square isn't as precise as your artboard, making the square bigger than your artboard to ensure there's no gaps are okay!

Now that you're done, make sure to click Done at the top panel so that it'll save your progress!
If you want to make a version with the background and without the background, you should save the version without the background first, add your background, then click the option Save a Copy
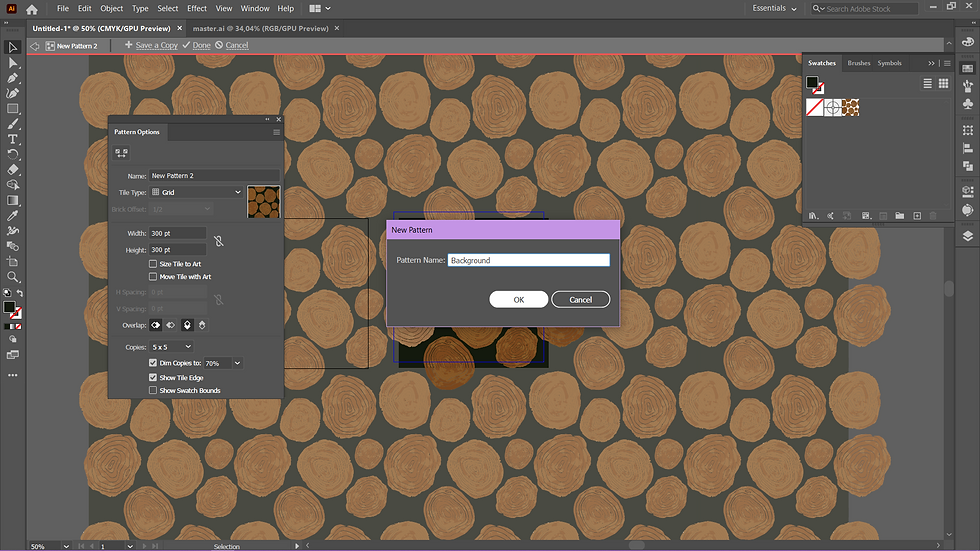
You will be asked to give your pattern a name, after you click OK, make sure to click Cancel! If you click done, then it will update your original pattern, and both your pattern will have background!
Now your pattern is ready to be used!

Simple right? Now you can go forth and make all the patterns you want! The possibilities are endless!
These patterns I've showed you how to make are one of the first patterns I've ever made, and I learn through trial and errors to be able to make these, and now, you can download them for free!
You can find them on the posts under the product category, or find them on my Gumroad!
Next time, I'll be teaching you how to export your swatch, and how to load them to new Illustrator file!
I hope you find this tutorial useful! If you like this, consider subscribing for updates on new posts and special discount on my Gumroad!


Comments